 I love this scene. I don't know where I found this image, but I love it.
Straw Bonnet...weekend warrior...
Ah, vacation days. Those days when you were supposed to go to an event, but circumstances forced you to stay home and just putter around. I was going to go to the in-laws and clean my new (old) letterpress, but alas, that didn't happen either, so I was able to spend hours and hours working on the project of my choice. Alas, so many to choose from. :) I decided to dive into the straw bonnet.
I'd made a straw bonnet once before--it was all machine sewn (bad me), so this time I wanted to hand-stitch it so the stitches remained hidden, and I could have more control over the shape. So for all those interested in the how-to, here's what I did. Just keep in mind I don't have a block, so I'm basically winging it:
1) I have a bonnet blank from Pam Robles that will be a covered bonnet one day, so I traced out the brim (crown?). Basically I traced out everything but the "tip" -- the back part of the bonnet. This was the portion of Pam's bonnet that started out as a flat pattern. So, I traced this pattern onto cardstock for future use, then traced that onto a piece of muslin. I've pinned the muslin to my ironing board, which will act as my block for now, since it's the only place I can really pin and steam the straw.
Starting at the front edge, I begin to sew the straw plait together, pinning and ironing (with steam) after each one, which is most effective, as the straw stretches a little and the thing can get out of shape REALLY fast. I've left about 1/8" (or about 1/2 the width of straw plait) from the front edge, because I'm going to have a long length of plait that will go all around the front edge, around the chin tabs, and around the back. I want to do that last, so I've left space for that plait to go.

2) Then I stitched a few more plaits together...

3) Kept stitching, until I had 12 plaits, pinning it and steaming it after each is sewn down. 12 plaits are what I decided would be a good "brim" width. I figured I'd have to do this in parts, because on some original bonnets, I've seen a difference between the rows of the brim and the rows of the crown -- particularly, that the rows are at two different angles...probably due to the way the straw has to lay when the crown reaches the tip, compared to the way it has to lay at the front edge. I've seen some originals that had the same lay from front edge to tip, but I like the look when the lay shifts.
So, I drew out extra lines on my muslin pattern. I measured out 2-1/8" from the front edge and drew a line; and about 1-1/4" from the back edge, where the crown meets the tip. The angles start out evenly at the sides, but they are definitely different in the center front, where the crown meets the brim. In the photo below, you can see the 12 rows of plaiting stitched together, and the 3 parts of my pattern.
The first part is the brim, the 2nd part is the crown, and the 3rd part is the back edge of the crown where the straw finally starts being stitched together in a full circle, rather than just individual strips.

And here is the brim pinned down within the dotted lines of the brim pattern. It stretched in some places (like the front center), and shrunk in places (like the outer edges). Pinning it down to the pattern and steaming the dickens out of it, then letting it cool, still pinned, will help it keep its shape. When I'm done with the brim and the crown, and have them stitched together, I will probably starch it...but I will get more research on that first before I do it.

So there you have it. Stay tuned for more adventures in straw. Cheerio!
A Few Wedding Photos...


We got married on April 19, 2008...but at the Mexia, TX Confederate Reunion Grounds, it was 1864. A gorgeous spring day, with nary a cloud in the sky...a soft breeze...and a preacher charging us -- with all due solemnity -- to love, honor, and cherish each other until death do us part. After all the work it took to pull off our "simple" wedding, I really can't ask for anything better than the day we got. It was just so beautiful.
 For all who are interested, the wedding dress I chose was an 1864 Charles F. Worth wedding gown, currently housed in the archives of a New York museum (see pic at right). It really is stunning. The picture I had was of the ball gown bodice, but when I ordered the pictures, I was able to get pictures of the wedding bodice as well (which looked like a standard day-wear bodice). Unfortunately, though, you couldn't see hardly any of it except for the sleeves. So, I had to do my best and sort of make it up. I left off the swans down, but kept the glass pearls.
 On the evening bodice, I managed to recreate it in all its glory. (Sorry for the grainy photo...it was night-time...and I was so tired. Getting married is such an ordeal!) I used a mini marabou to simulate the swans down, one of my friends helped me finish the crystal beaded fringe, and my mother finished up the trim that covered the raw edge of the down. It was a project, to say the least. If you want close-up pics, I can provide them.
My hoop was new, also...it was an 1864 covered hoop from "Corsets & Crinolines" by Norah Waugh. It looked like it would have this long train at the back, but with all the fabric heaped on it, it smooshed a bit and gave me the perfect silhouette I'd been dreaming of. Now if only I can make that up in a cage instead of a covered hoop, I'd be in business.
I have so many people to thank. :) I still haven't been had an opportunity to wear my "bridal satin" (taffeta!) since the wedding, although it was expected that a bride appear in her wedding clothes during the first year or two of marriage. I hope to wear the ball dress this December, at our unit's Christmas event! I just hope I can fit in it! Ha!
Headwear...for Spring!
As if I don't have anything else to do. Seriously.
 So I've been wanting to make myself a straw bonnet or hat for like...uhm...2 years, but never found the right bonnet to fit me with my long-ish face and height. Thankfully, Pam Robles came to the rescue and provided me with a lovely low-brim bonnet blank that I've traced to make up a straw version. (The bonnet blank will soon become a covered bonnet.)
I've made one straw bonnet already, but I machine stitched the whole thing and really didn't have a base or frame to go on, so even though it turned out well, I knew deep in my heart that I'd done it all wrong. To have sewn it by hand would have taken forever, and I cheated. I'm bad.
What makes this straw headwear project extra fun is that I'm going to also try to make a straw "Watering Place" hat. These are not represented at reenactments, simply because reenactments are considered either on the battlefield, or in "town" (where the Civilian reenactors camp). There aren't many "watering places" or garden parties at reenactments. But I loved the shape of it and wanted to at least try it for the sake of trying.
You know. In case I happened upon a "watering place".
The straw I'm going to use is the copper Milan straw from Judith M Millinery. She has great supplies for this kind of thing.

I've made one straw bonnet already, but I machine stitched the whole thing and really didn't have a base or frame to go on, so even though it turned out well, I knew deep in my heart that I'd done it all wrong. To have sewn it by hand would have taken forever, and I cheated. I'm bad.
What makes this straw headwear project extra fun is that
You know. In case I happened upon a "watering place".
The straw I'm going to use is the copper Milan straw from Judith M Millinery. She has great supplies for this kind of thing.

Gent's Drawers - Original Pattern
In May 1864, the Sanitary Commission put out a pattern for "Flannel Drawers". Looking for an easier/quicker pattern than the Past Patterns I'd made up a year ago, I consulted with the wise folks at the Sewing Academy and was given this pattern as an alternative. I finished it in two nights, and that was while I was also replacing a collar on DH's shirt, making up a quick apron for myself from the remaining shirt fabric, and eeking out one more buttonhole on my wrapper (5 down, 23 to go). :::whew!:::
So here's the pattern and the final product. It fits nicely. DH is pleased.


Edited to add the instructions:
Required for each pair of Drawers. 1 tape stay, one inch long, (for opening in back.), 3 knots linen thread, 3 black bone buttons, Narrow tape for back of waistband (18 inches long). Directions for Making.—If the flannel to be used is less than thirty inches wide, put the point at the back close to the edge of the flannel and piece the fronts, as shown by the dotted lines above. The opening below the waistband in the back should be four inches long. The opening in front should be seven inches long and faced with flannel or silesia, two inches wide. Two buttons should be put on the waistband in front, and one on the opening below. There should be four eyelet holes on each side of the waistband behind. Waistbands should be lined with silesia. Drawers to be closed to the ankle, and finished with hem.
Cheers!
1860s Nightgown
A while ago, I created a full length nightgown based on an original "short nightdress" of the 1860s. I've seen some of these in Godey's 1860 and 1861 in the book "Fashions and Costumes from Godey's Lady's Book" by Stella Blum This was a truly fun project to do, because it had such fabulous tuck detail on the yoke and cuffs. Many many tucks, I say (tucks and pleats seem to be my lot in life), and it took quite a while to finish. But overall, it turned out pretty close to the original here:


Here are pics of the reproduction:


I'm standing funny, apparently, because mine doesn't have the "flare out" from the yoke that the original has. Another annoyance (because I'm a perfectionist) is that I didn't get that deep curve in the front of the yoke done like the original. But oh well. It's a warm, comfortable nightgown that I've even worn at home during cold weather. Enjoy!
The Tiny Hoop Update
After a few joyous hours of sewing on Friday night, I was able to get the Tiny Hoop mostly finished. It's turning out so cute -- I just hope it's the right size. But based on the measurements I've received, I'm pretty confident it's right. The photos below show the hoop with and without a "skirt" (aka a piece of muslin I happened to throw over it to see how it draped).


The Tiny Hoop Project
I couldn't help it. I held off as long as I could, but my friend's daughter, Sarah, is 5 years old now and ever since she was born I wanted to make her a little hoop. She was kind of small back then ;-) but 5 years is a long time to wait! And when I ran across some old hooping wire from my hoop, I knew just what I needed to do with it.
So, a few nights ago I embarked on The Tiny Hoop project. It's just in early stages of forming. As you can see it only has one flounce on it so far, and I'm trying to determine whether she needs two or three bones (I think three). My goodness, how adorable will she look!!
Don't laugh at my hat-stand-turned-dress-form. I didn't have anything else to mimic a 21" waist and 42" height. :)


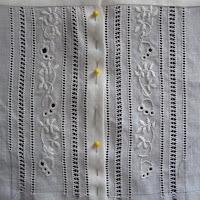
Fancy Chemise
For my wedding, I really wanted to have a fancy chemise, but alas, the dress took so much time I wasn't able to finish it. Luckily, after the wedding and the dust settled, I had an opportunity to do some pulled thread work on the chemise bodice. I will probably do some work on the sleeves, too, but I'm not sure what yet. It'll probably be a simpler version of what I did on the front. At any rate, here is the bodice. The rest of the project is on hold for the time being, only because there are a few more important things to get done first.


1850s Wrapper Project
A week ago, I started on a new project: a recreation of an 1850s wrapper. This post is mainly a catch-up of what I've done with it so far, so I'll cover the basics. First, I bought the fabric from Reproduction Fabrics--a fabulous place to get repro fabrics. It's a paisley stripe pattern with cream and red as it's main colors. I dig it. :o) Second, I used Atlanta's pattern from the original as a base and started cutting it out and sewing it up. It was fairly easy--just like a regular dress except the front of the bodice was lengthened to the floor and stretched out across the folded width of 45" fabric. I pleated in the shoulders (do this after fitting the muslin under-bodice) and scalloped the front edge, per the original. Here are some pics to show where I'm at thus far. The originals are shown first:


And here are my photos:


And here are my photos:


Welcome to the 1860s!
This is my first posting of my new blog, A Day In 1862, where I will be posting stuff about Civil War reenacting (my biggest hobby) plus pics of sewing projects I've done and am doing. I hope it will turn out to be a good resource to those of you who love reenacting and historical sewing like I do.
Subscribe to:
Posts (Atom)